CRF110F Technical Data
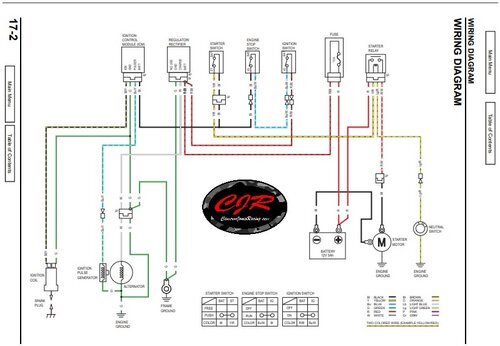
HONDA CRF110F WIRING DIAGRAM 2013-2018
Honda CRF110F Wiring Diagram
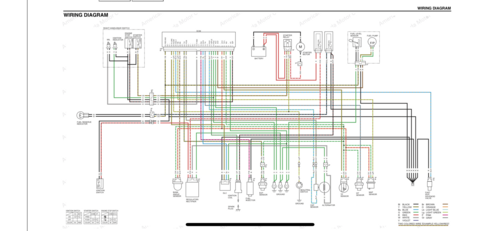
Honda CRF110F 2019 Wiring Diagram
Honda CRF110F 2019 Wiring Diagram
Honda Crf110f spec sheet 2013-2018
-
ENGINE Engine Type - 109cc air-cooled single-cylinder four-stroke
-
Bore And Stroke 50.0mm x 55.6mm
-
Compression Ratio 9.0:1
-
Valve Train SOHC; two-valve
-
Induction 13mm piston-valve carburetor
-
Ignition CDI
-
DRIVE TRAIN Transmission Four-speed with automatic clutch
-
Final Drive Chain
-
Front Suspension 31.0mm telescopic fork 3.9 inches of travel
-
Rear Suspension Single-shock; 3.4 inches of travel
-
Front Brake Drum
-
Rear Brake Drum
-
Front Tire 70/100-14
-
Rear Tire 80/100-12
-
DIMENSIONS Rake 24°25' (Caster Angle)
-
Trail 52.5mm (2.0 inches)
-
Wheelbase 41.9 inches
-
Seat Height 26.3 inches
-
Curb Weight 163 pounds (Includes all standard equipment, required fluids and full tank of fuelready to ride)
-
Fuel Capacity 1.1 gallons, including 0.3-gallon reserve
-
Ground Clearance 6.9 Inches