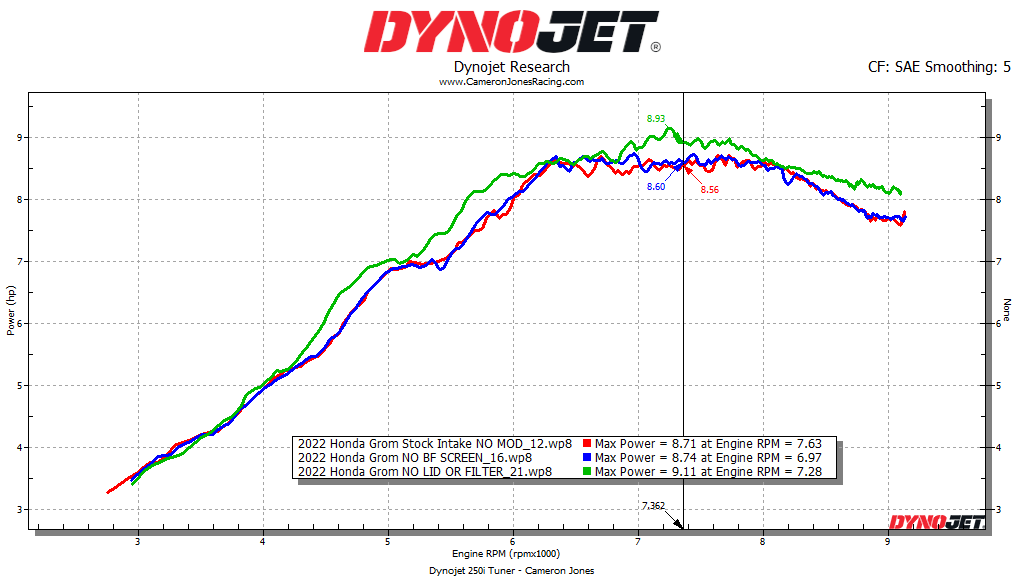
- CJR 2022 Honda Grom Dyno Testing Data -Had a chance to sit down and go over our data so far of the 2022 Grom/MSX125. Starting off with the first image we have a bone stock 22' Grom with a few break in miles (35-38mi) coming in at a whopping 8.71hp. We removed the backfire screen and after some runs we found there was no improvement to performance, unlike the 2014-2020 Honda Grom as well as the Honda Monkey in which we did find a slight advantage when the backfire screen was removed. We then removed the airbox lid/filter for a few passes to see what was left on the stock airbox/hose. We found a good improvement in mid range torque and average .5hp gain in the higher rpm area near redline so an intake lid modification would be a good addition.

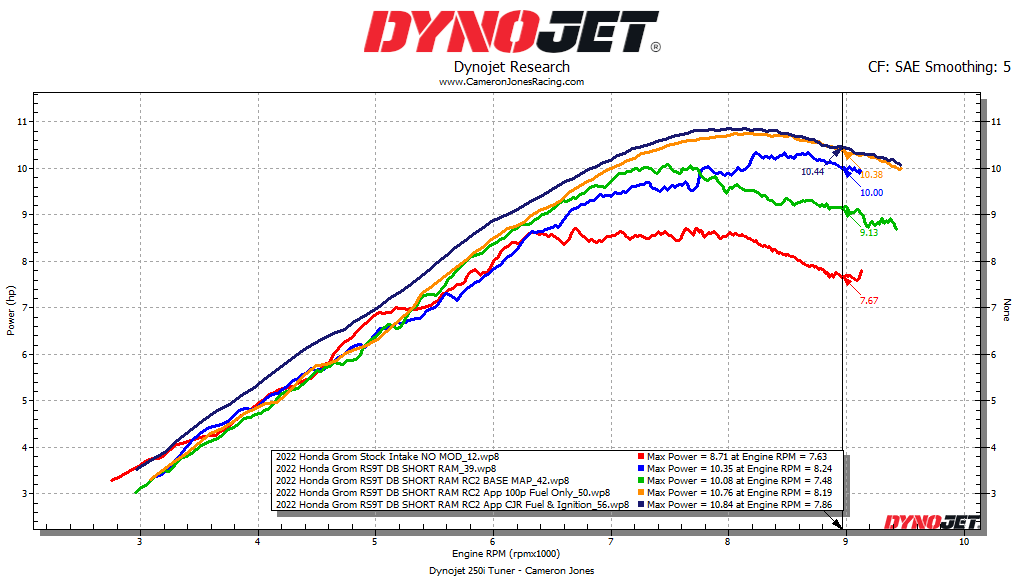
Moving over to the 2nd graph we added in the Yoshimura RS9T Full System exhaust and happy to see Yoshimura continuing to add the O2 bung for AFR data and future autotune kits for customers. This addition brought in an improvement across the entire rpm range with a 13% increase at redline. We followed up with removing the airbox lid as an easy test which netted an additional .4hp/5% increase in midrange and 1.25hp/13% increase in near redline. Removed airbox lid netted an additional 7% increase in midrange and 2.5% increase near redline. AFR was relatively in spec however the power curve was not very smooth in which we later found tuning would clear up.
Due to the tight throttle body clearance facing directly back towards the frame, we found some of the older intakes will not work with the new model. We settled on the Dinger_Built LLC Honda Monkey short ram intake which fit the bend while we chased higher rpm gains (we'll come back to the low end rpm intakes like the upcoming Mnnthbx and Dinger Mid-length intake a little later). The shorter intake which makes more peak rpm at the sacrifice of low to midrange with the tighter/longer intakes. This netted an additional 12% increase over the stock intake at 8600rpm however with an expected loss of 12% in the mid range compared to the stock intake.

Moving forward we added the ARacer USA RC2 ECU and started off with it's initial base map. This base map is designed for a completely stock bike and found it to be very lean on this configuration in the higher RPM however decent through the low-mid range. The addition brought in an increase of 7% midrange on the base map and a loss of 10% in the higher RPM area. After some simple fueling changes using the smartphone app (not diving into AF1 just yet, and yes you can have a reliable map without the AF1 system when tuned properly) we were able to really smooth out the curve with a 9% increase at 8,000rpm. With the added ignition timing it brought a lot of life into the low-mid range power at an 11% gain with the top end being very similar in the last 1,000rpm with minimal changes needed. With additional adjustments on the RC2 within the computer software, we may see some improvements in that area like we did on the previous models. - Something to note is during tuning - at 60% throttle with intake/exhaust/rc2, we were making as much power as we were with the stock bike at 100% throttle to give you an idea of the improvement so far.- Final gains from stock to RC2/DB SR Intake/Yoshimura Exhaust with the OEM Camshaft = 12.3% low rpm gains / 13% improvement in midrange / +35.6% increase at factory redline.

Moving forward from here we added our first test camshaft (V1) and played with the adjustable cam sprocket a bit. One thing to note when removing the OEM sprocket is comparing to the older model, the new 22' Grom's cam sprocket is about 2-3* advanced vs the previous 2014+ Grom/Monkey's. So the new cam sprocket can be used on the older models to increase low end response (check clearances) however with the sacrifice of top end gains. Same with the new bike using the old sprocket (again check clearances) on the new build to retard the cam timing. With the V1 camshaft in the 0* changed position from stock we netted an additional 4-5% across the entire RPM range vs the stock camshaft. Retarding the camshaft -4* netted a 3.5% increase at 9400rpm vs the 0* position with a loss of the same 3.5% in the lower RPM range. We then moved the cam sprocket the opposite direction 8* to advance the camshaft +4* from stock. From here we added a 4.5% increase in low end at the loss of the same 4.5% increase in top end. While 3-5% changes sound minimal, this is something you can absolutely feel with throttle response when advanced or that few extra mph on top speed runs when retarded back. This is a great example of showing how you can shift your power around with a rather small change of cam timing. Stunt riders or around town/short shifting style of riding may enjoy a more advanced cam sprocket adjustment while backroad and highway riders may benefit more from the retarded camshaft adjustment. With that said we enjoyed the best of both and opted to keep it at the stock cam timing for the test ride.Moving into our 2nd camshaft test (V2) supplied by DHMotoring we found an improvement over the entire RPM range with a 3% increase in low, 3.7% increase in midrange and a 9% increase in top end performance vs the V1 camshaft. This is comparing both camshafts at 0d cam timing change.

FINAL RESULTS SO FAR - Yoshimura Full System, Dinger SR Intake, DHM V2 Camshaft, aRacer RC2 / smartphone app tuned ECU -+17% increase in low end22.5% increase in midrange+60% increase at redline - Top speed - Netted 76.1mph GPS full tuck on flat ground with no wind/draft on the speed run with 170lbs rider after moving to the 14t front sprocket once data was complete. Pro taper mx bars, no mirrors and shorts/t-shirt for the extra aero. General upright riding position we see around 65mph +/- 5 depending on the wind and with jeans/jacket averaged a 5-7mph loss.
Temps -We found long wide open rides oil temp was in the 250* range (which isn't terribly crazy for these stock piston air cooled bikes) however even with reduced ignition timing and richened target AFR we continued to see the same oil temps. With no oil cooler option just yet, we chased other things we knew that built heat. The old bike struggled crankcase pressure relief during long high rpm riding and often times riders would have some oil in the airbox from the vent. We threw on the Avail Motorsports cam cover crankcase breather and on back to back 30 minute wide open rides, I was surprised to average 10-15* less oil temp even after a heat soaked engine from the first 30min session.
I am happy to share with this platform we are working closely with our friend David at www.DHMotoring.com & Andrew with https://availmotorsports.com/ to put our heads together and tackle the R&D end for the engine department. What better way to have multiple companies come together to help bring the best products and information we can to help further improve the bikes! We are looking forward to working with more companies in the future and excited to see where this platform heads! Stay tuned for our 500mi ride review and modification update of the build! Interested in getting some products tested or included in our videos? Send us an email at CJRPerformanceLLC@gmail.com

